
The Comb Mistake That Snaps Thin Wet Hair, and the 5-Step Fix
If you’ve ever tried to detangle thin wet hair, you know the sound. That tiny snap when the comb meets resistance and you feel it give, followed by the short broken pieces you find on the bathroom counter afterward.
Here’s what’s happening at that moment. Wet hair stretches far more than dry hair before it breaks, and thin strands stretch the most of all. Past a certain point they don’t spring back, so the cuticle fractures and you’re left with frayed, split ends.
Tangles themselves aren’t a sign that your hair is damaged. They’re just what thin strands do when they swell with water and wrap around each other in the shower.
The safe way to detangle thin wet hair comes down to three things: slip, a tool that bends, and holding the hair so your roots never take the strain. Here’s the method step by step.
The Thin Hair Detangling Golden Rules
- Never comb bare wet hair. This is the first rule of learning to detangle thin wet hair safely. Always put something between the comb and the strand first, whether that’s conditioner still in, a leave-in mist, or a single drop of light oil.
- Work bottom up, two inches at a time. Clear the very ends, then move up an inch or two. Starting at the roots pushes every knot down into one solid mass.
- Anchor with your hand. Hold the section firmly above the knot you’re working on. Your hand takes the pull instead of your scalp and your roots.
- If the tool can’t bend, the hair breaks instead. Flexible bristles and wide, seamless teeth give way when they meet a knot. Rigid teeth don’t, and something has to give.
Which slip product suits you depends on your porosity. Low porosity hair sits under a mist and stays slippery, while high porosity hair drinks it straight in and goes grabby again within a minute. Our Hair Porosity Finder will tell you which you’re working with before you buy another detangler.
The 5-Step Method to Detangle Thin Wet Hair
1. The Microfiber Squeeze
Step 01 • Before you touch a comb
Press the water out with a microfiber towel or an old cotton t-shirt, squeezing gently from the top down. Never rub.
When you detangle thin wet hair, weight works against you. Soaking wet hair is heavier, and that extra weight drags against every tooth of the comb. Getting it from dripping to damp cuts the resistance noticeably before you start.
Tool or method: Microfiber towel or a soft cotton t-shirt
Common mistake: Rubbing the head or twisting hair into a turban
Zero-snap rule: Damp, never dripping, before a comb goes near it
2. The Weightless Slip Shield
Step 02 • Adding slip
Mist a light detangling spray through the lengths, or warm a single drop of squalane or jojoba between your palms and press it through the ends.
Slip is the single biggest factor when you detangle thin wet hair, and you want it without weight. Thick butters and heavy creams coat thin hair and make the comb drag more, not less, which is the opposite of what you need here.
Tool or method: Light detangling mist, or one drop of squalane or jojoba
Common mistake: Heavy butters and rich masks on fine hair
Zero-snap rule: Enough slip that your fingers glide before the comb does
3. The Two-Section Parting
Step 03 • Making it manageable
Part the hair down the middle with your fingers and bring one side forward over each shoulder. Clip one side away if it helps.
Nobody can detangle thin wet hair well while fighting a full head at once, because means you’re always pulling against hair that’s still tangled behind you. Two sections halve the resistance straight away.
Tool or method: Fingers or a soft clip, no rat-tail comb
Common mistake: Trying to detangle the whole head in one go
Zero-snap rule: One section at a time, always
Your cut matters here more than most people realize. Feathered, over-thinned ends tangle far more than a blunt line does, which is one more reason our haircuts for fine hair guides keep insisting on a solid perimeter.
4. The Hand-Clamped Bottom-Up Pass
Step 04 • The main event
Hold a section firmly between your fingers a few inches above the ends, then comb only the hair below your hand. Work the very tips until they’re clear.
This hand-clamped pass is the heart of how to detangle thin wet hair. Move your hand up an inch or two and repeat, then again, until the comb runs from root to tip in one pass. Your hand absorbs every tug so your follicles never feel it.
Tool or method: Wide-tooth seamless comb or a flexible wet brush
Common mistake: Combing from the roots downward
Zero-snap rule: Nothing below your hand tangles before you move up
5. The Final Smooth Pass
Step 05 • Checking your work
You are almost done. Once each section glides, run the comb through slowly one last time from root to tip, keeping your hand loosely under the hair as support.
If you hit anything at all, stop. Go back to that spot with your fingers and a little more slip rather than forcing the comb through it.
Tool or method: The same comb, no extra pressure
Common mistake: Yanking through a last stubborn knot to finish faster
Zero-snap rule: If the comb catches, fingers first, always
Tools That Save Thin Hair, and Tools That Snap It
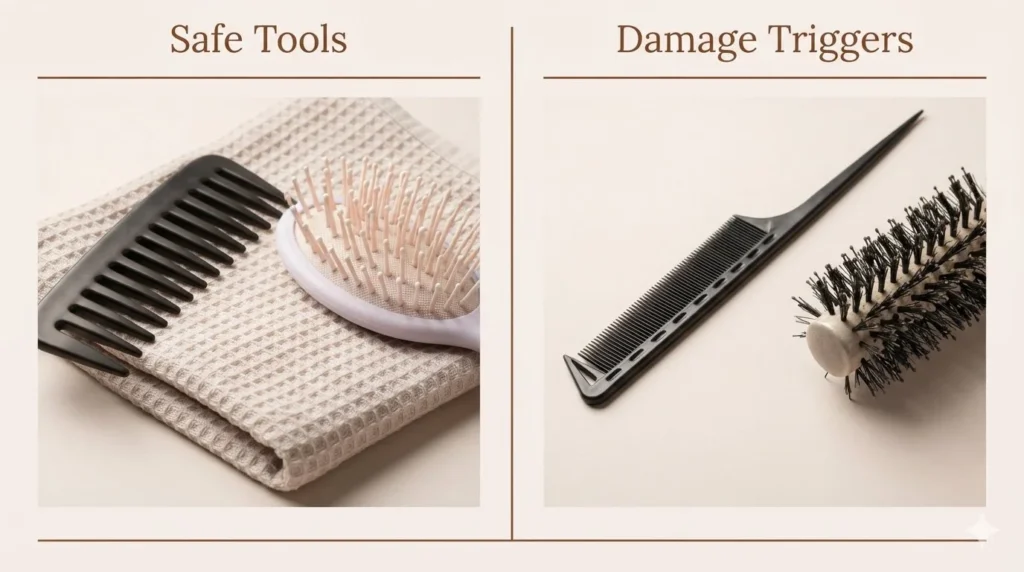
Worth owning to detangle thin wet hair: a flexible wet-detangling brush whose bristles bend back when they meet resistance, and a wide-tooth comb that’s saw-cut or carbon, with no molded seam running down each tooth. Run your thumbnail along the teeth. If you feel a ridge, that ridge is catching your cuticles every single pass.
Keep away from wet thin hair: fine-tooth tail combs, rigid round brushes, and any brush with missing bead tips on the bristles. Those exposed ends scrape the cuticle open, which creates more tangles next time.
Research on hair breakage during wet and dry combing found more damage when hair was combed wet, which is exactly why the tool and the slip matter so much at this stage. Dermatology reviews of how conditioners work explain the other half: conditioning agents cut the friction between strands so the comb meets less resistance to begin with.
Frequently Asked Questions
Should I detangle thin wet hair in the shower or after?
In the shower is safer, with conditioner still in, and it is the easiest place to detangle thin wet hair. That’s the slipperiest your hair will ever be, and slip is what protects it. If you prefer to wait, squeeze the water out, add a leave-in mist, and detangle while the hair is damp rather than soaking.
Comb or brush on wet thin hair?
To detangle thin wet hair, a wide-tooth seamless comb is the gentlest option, and it’s what I’d hand most people with thin hair. A flexible wet brush is faster and fine too, as long as the bristles genuinely bend. Rigid bristles on wet hair are where the breakage comes from.
Why does my thin hair tangle so badly the moment it gets wet?
This is the reason it is so hard to detangle thin wet hair straight out of the shower. Water swells the strand and lifts the cuticle scales, so the surface goes from smooth to slightly rough. Rough strands catch on each other, and thin hairs have more freedom to wrap around their neighbors. It isn’t a sign of damage, it’s just physics.
How do I stop a knot tightening when I comb it?
Stop combing it, because forcing a comb is how most people damage hair while trying to detangle thin wet hair. Hold the hair above the knot, add more slip, and tease the knot apart with your fingers from the outside edges inward. Combing a tight knot only pushes more hair into it and pulls it smaller and harder.
Once you detangle thin wet hair fully and it is smooth, resist the urge to brush it again as it dries. Let it be, and build your lift at the roots instead, which our volume and thickness guides walk through step by step.
Final Thoughts
Slip and patience beat force every time you detangle thin wet hair. Every knot gives way eventually if you approach it from the ends with enough lubrication, and none of them give way to a hard yank without taking hair with them.
Give yourself three extra minutes to detangle thin wet hair properly and check your brush afterward. Fewer short broken pieces is the only proof you need that the method is working.