
The Easy Low Chignon Bun for Work That Needs No Hairspray
Seven minutes before you leave, ends still damp, and the only thing between you and a 9 a.m. meeting is a can of hairspray that will have your hair feeling like straw by noon.
An easy low chignon bun for work solves that, and it does it without a single spray. A chignon is not a messy bun with better lighting. It is a low, deliberate coil that sits at the nape, and it reads as composed in a room full of people who notice that kind of thing.
The hold comes from physics, not chemistry. Friction between strands, the pull angle at the nape, and two U pins crossing inside the coil. Get those right and the bun outlasts a commute, a headset, and dinner afterward.
Below is the toolkit, the five step method, the adjustments by hair type, and what to do when a pin slips at 2 p.m.
The 30 Second Toolkit
Four things replace a can of aerosol, and all four fit in a desk drawer. The style needs nothing beyond these.
| Tool | What it replaces | Why it works |
|---|---|---|
| French U pins | Half a pack of bobby pins | Two prongs enter at different angles, so the pin braces against itself |
| Seamless elastic | Elastic with a metal crimp | No metal join means no snag point, where most nape breakage starts |
| Matte balm or solid oil | Aerosol hairspray | Grip between strands with no shell, so hair stays soft and the bun stays put |
| Boar bristle brush | Gel or wet comb slicking | Moves your own sebum down the shaft, which is free friction and free shine |
Buy the U pins in your own hair color. Three is the working number for most heads and six for thick hair.
Why an Easy Low Chignon Bun for Work Holds Without Hairspray
Hairspray glues strands into a shell. Break the shell and the shape collapses, which is why a sprayed bun looks perfect at nine and ragged by three.
Mechanical hold works differently. Three forces hold this low chignon in place all day.
Friction. Slightly textured hair grips itself. Second day hair holds a chignon better than freshly washed hair, every time.
Tension angle. Pull straight back and the coil hangs. Pull slightly up and it sits.
Interlock. Two U pins crossing inside the coil form an X, and each blocks the other from backing out.
Everything below is how to set those three up in three minutes.
The 3 Minute Blueprint for an Easy Low Chignon Bun for Work
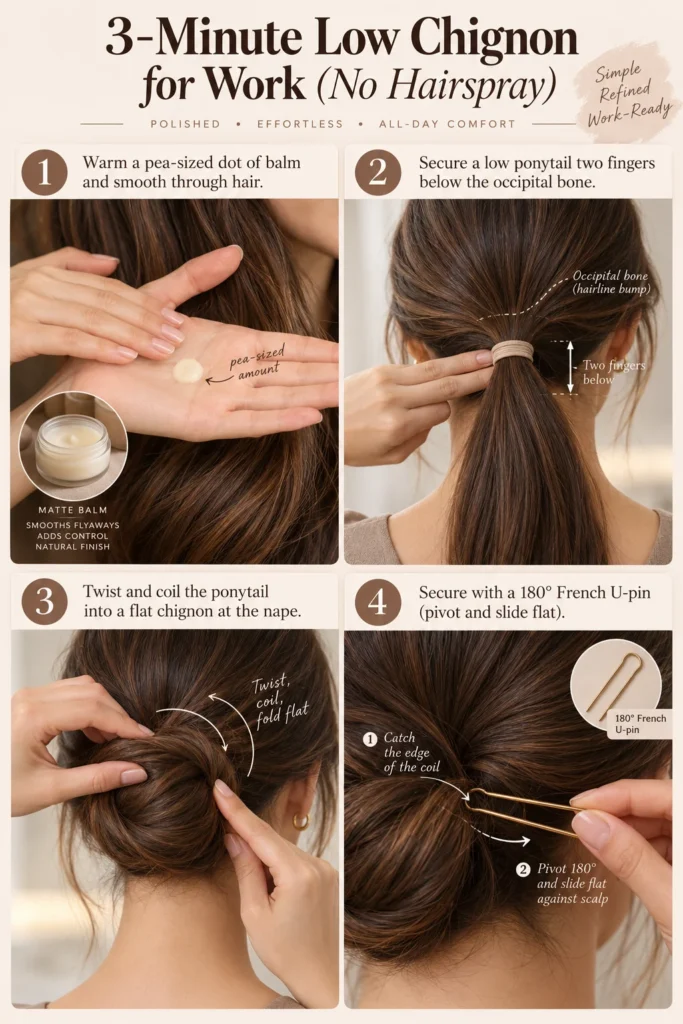
Step 1: Build Traction Before You Touch the Elastic
Freshly washed hair is slippery because the cuticle is clean and flat. Warm a pea of matte balm between your palms, then run it over the mid lengths and ends only. Never the roots.
Second day hair usually needs nothing. Brush from scalp to ends with the boar bristle brush instead, which moves your own sebum down the shaft and gives the same grip for free. If even balm weighs your hair down, our volume and thickness guides cover the root level alternatives.
Step 2: Find the Nape Anchor Above Your Collar
Tilt your chin down and feel where your skull curves into your neck. The bun sits just above that, roughly two fingers below the occipital bone. Any lower and a blazer collar rubs it loose by the second commute.
Gather everything there and secure with a seamless elastic. Pull the ponytail slightly upward as you wrap, not straight back. That angle keeps the finished coil from sagging.
Step 3: Twist, Then Wrap the Weight Around Itself
Twist the ponytail in one direction until it starts to coil on its own. Twist from the wrist rather than the shoulder, because a wrist motion keeps tension even and a shoulder motion yanks at the elastic.
Once it wants to coil, wrap it clockwise around the base and tuck the tail under the bottom edge. That tucked end is structural, so push it fully under.
Step 4: The 180 Degree French Pin Interlock
This is the step everyone gets wrong. Do not stab the pin straight in. Catch the outer edge of the coil with both prongs, pivot the pin 180 degrees toward your scalp, and slide it flat so the prongs run parallel to your skull.
Place the second pin from the opposite side so the two cross inside the coil. That X is the interlock. Two pins placed this way hold better than eight bobby pins placed badly.
Motion: Catch the edge, pivot toward the scalp, slide flat
Common mistake: Pushing the pin inward, which grips nothing and falls out within an hour
Pin count: Two for fine hair, three to six for thick hair
Step 5: Boardroom Slick or Soft Corporate Finish
For the slick version, run damp palms over the crown and smooth any lift with the brush. Nothing else. This style only reads polished when the hair still moves, and a sprayed crown photographs stiff on video calls.
For the softer version, pull two thin pieces loose at the temples and press them between warm fingers so they bend rather than stick out. That one adjustment takes the coil from severe to approachable.
Adjust the Chignon to Your Hair Type
Fine or flat hair
Before you twist, slide two fingers into the ponytail at the base and push a small loop upward to make a soft bump. That micro twist hides under the coil and stops the bun reading flat. Blunt ends also tuck more neatly than feathered ones, which is why our haircuts for fine hair guides keep pushing a solid perimeter.
Thick or heavy hair
Split the ponytail in two and twist the halves into a rope before you coil. A roped coil spreads weight across a wider base instead of hanging a full head of hair off one point. This is the fix for the dull ache that arrives by late afternoon.
Textured or curly hair
Do not brush the crown out. Smooth only the back section with damp fingers, keep the curl pattern on top, and let the coil sit looser and rounder. Curly ends tuck best slightly damp, so mist the last two inches only.
Desk Drawer Troubleshooting
The headset test
A headband headset lands exactly where a high bun sits, which is the argument for keeping this one low. If the band still catches, shift the coil lower and flatter rather than tighter. Tight is what gives you the headache.
The 2 p.m. slump
When it loosens, do not take the whole thing down. Find the pin that worked its way out, pull it halfway, pivot it back toward your scalp, and slide it flat. Ten seconds in a restroom mirror. One spare U pin in your bag means a slipped pin never becomes a rebuild.
Humidity and a rainy commute
Frizz on a wet commute is water entering the cuticle, and no spray stops that. A pea of matte balm smoothed over the surface at your desk flattens the halo without stiffness.
Frequently Asked Questions
Will this style cause tension headaches or hairline breakage?
Not if the tension sits in the coil rather than at the scalp. You should be able to slide a finger under the elastic at your hairline, and nothing should feel pulled at the temples. Repeated tight pulling at one spot is a real cause of traction hair loss, as the American Academy of Dermatology notes, so vary your part line.
Can I do this on wet or damp hair when I am running late?
Damp works, soaking does not. Wet hair is weaker and takes more damage from combing and pulling than dry hair, which published combing research measured directly. Towel it properly first, keep the elastic loose, and take the bun down when you get home.
How is this different from a standard low ballet bun?
A ballet bun is wrapped tight and evenly round, usually over a donut form. A chignon is a coil with a visible fold, flatter against the head, and the shape is allowed to be imperfect. That softness is the whole difference in a meeting room.
How long does an easy low chignon bun for work actually hold?
A full working day when the pins are interlocked properly. Fine hair holds longest on second day texture and thick hair holds longest roped. If yours drops within two hours, the pin angle is the problem, not the amount of product.
Final Thoughts
An easy low chignon bun for work is a pin technique, not a product routine. Learn the 180 degree pivot once and you will not buy hairspray for an updo again.
Practice it twice on a weekend rather than at 7 a.m. on a Monday. By the third try it takes three minutes. If your hair is fine or fragile, our guides on protective styling for delicate hair cover how low to keep the tension.